As I mentioned in my first post there are many ups and downs in sewing. My students and I experience both every day. One thing I warn them about when we get on the machines is: Some days you will come into class and everything will go well and you will just be happy as a clam about sewing. Other days you will come in and your sewing machine won't work and you are going to get so frustrated you want to quit. I always make sure to tell my students multiple times to do your best to work through the frustration because nothing is going to be solved if you just quit. If you can work through it, you will be glad you did. With that being said there were way more celebrations than frustrations today!
Today's Objective: Use your sewing knowledge that you've gained in class to practice using the machine with fabric.
I always let my students try for themselves first before I demo each specific stitch. They love this because they get a chance to experiment with stitches that they may not get to use in class. Since they have already sewn on paper they have a little more knowledge of what to do with the machine. At the beginning of class, I quickly mention what every stitch will do and challenge them to create a backstitch for the first time. Today, I wrote instructions on the whiteboard that described how to create a backstitch using terminology that was on their sewing test.
Frustrations: So, apparently there are different shapes of bobbins. Some are rounded off at the top-
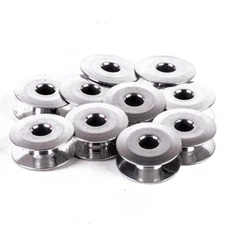
and some are straight at the top-

If you can spot the difference, gold star for you!

(I do not own the above images they can be found on Google)
This actually provides hardships for my students because the rounded bobbins fit in the machine, however, they are not made for the machines we have in class and can make the thread tangle up at the bottom. It is an easy fix for me, but very frustrating for my students. Pro Tip: When there is an issue instead of having the students raise their hand or shout out your name, designate a place on the board as the Help Me! area. This way the students can write their name on the board and you know what order to help students. It gives them a chance to stand up and walk to the board and stretch their legs from sitting at the sewing machine all period.
Celebrations: The celebrations outweighed the frustrations today. To me, that makes it a very successful day!!! Today, I had one student successfully wind her bobbin! (As seen in the Boomerang below)
Also, one of my students figured out something about the sewing machine that I didn't know and taught me!!! I don't have a Janome machine at home (I'm more of a Brother kind of girl). So, I am figuring all the ins and outs while my students are figuring the ins and outs. Overall, it was a great Friday of sewing! I can tell that my students are starting to enjoy it more and more.
Below are a few pictures from today


If you want to see more of my wonderful students doing their thing follow me
on Twitter- @_Mrs_Hawk_
or on Instagram- @OnFireForFACS
No comments:
Post a Comment